LIKE @ CLICK လုပ္​ခဲ့ၾကအံုး​ေနာ္​
Blogger Tips and TricksLatest Tips And TricksBlogger Tricks
​ေဒါင္​း​ေလာ့လုပ္​နည္​း ဖတ္​​ေပးပါ

Galaxy J2 SM-J200GU VER 5.1.1 Root

Galaxy J2 SM-J200GU ဖုန္းအတြက္ ဗားရွင္း 5.1.1 ကို Root လုပ္ခ်င္တဲ့
ညီအကိုေတြအတြက္ ျပန္လည္မွ်ေ၀ေပးလိုက္ပါတယ္၊ ဒီ ဗားရွင္း 5.1.1 ကို
Kingroot apk ျဖင့္ ဖုန္းမွာ Root ေဖာက္ယူႏိုင္ပါၿပီ ကြန္ပ်ဴတာမလုိပါ။
ဒီေန႔ က်ေနာ္ စမ္းသပ္ၿပီးသားပါ စကၠန္႔ပိုင္းပဲၾကပါတယ္
Kingroot apk ကို ေအာက္ကလင့္မွာေဒါင္းေလာ့ရယူလိုက္ပါ
Apk ျဖင့္ Root လုပ္နည္းကိုေတာ့အထူးေျပာေနစရာမလို
ေလာက္ေတာ့ဘူးထင္ပါတယ္ ေအာက္မွာရယူလိုက္ပါ။

ျမန္မာစာအမွန္ထည့္နည္း
===============
ဖုန္းမွာ Root access ရရွိၿပီးရင္ေတာ့ ျမန္မာစာအတြက္
အမွန္ရခ်င္ ကီးဘုတ္အတြက္ Frozen ကုိထည့္ၿပီး
ေဖာင့္အတြက္ ifont & Zawyi One apk ရိုးရိုးေလးကို
ထည့္သြင္းၿပီး iFont ကေန Zawyi One apk ေလးကို
ထည့္သြင္းေပးလိုက္ပါ ျမန္မာစာလံုး၀အမွန္ျမင္ရမွာပါ။
အဆင္ေျပပါေစ....

J7 2016 SM-J710GN/SM-J710FRootလုပ္နည္း

Samsung Galaxy J7 2016 SM-J710GN/SM-J710FRootလုပ္နည္း ကြန္ပ်ဴတာမ
မလိုပါဘူးဖုန္းေပၚမွာတင္ေဖာင့္နိင္
ပါၿပီေနာက္ဆံုးထြက္ ဗားရွင္း 6.0.1 Marshmallow Root လုပ္နည္းကို
ေတာင္းဆိုထားၾကတဲ့ညီအကိုေတြအတြက္ တင္ေပးလိုက္ပါတယ္။
ဒီ J7 2016 Edition အတြက္ SM-J710GN/SM-J710F ဆိုၿပီးModels ႏွစ္မိ်ဳးသာထြက္ရွိထားပါတယ္ဒီဖုန္းေတြကို Rootလုပ္မယ္ဆိုရင္ေတာ့ပထမ ဆံုး Kingroot version 4.9.2 ကိုအရင္ေဒါင္းပါမယ္
ေဒါင္းလို႔ရလာတဲ႔ kingroot apk ကို Install လုပ္ပါျပီရင္ phone setting>>>> About Phone>>>>>Build number ကို 7 ခ်က္ 8ခ်က္ဆက္နွိပ္ေပးပါ ျပီရင္ About phone ရဲ႔အေပၚမွာ Developer options ထဲကိုဝင္ပါျပီရင္ OEM Unlocking ဆိုတာကိုဖြင့္ေပးပါဒါဆိုရပါျပီး Kingroot Apk ကိုဖြင့္ျပီး Root လုပ္ခိုင္းလို႔ရပါျပီးအားလံုးအဆင္ေျပပါေစ
Image Hosted by UploadHouse.com

WebServer via Getmecom Wifi (Azplay)

How to Use Webserver / Webremote:

On Android Phone:
1. Install StbSmartClient application, can be downloaded here
2. Install applications such as video player or VLC MXPlayer android, download PlayStore or here
3. Launch Application Stbsmartclient, the initial view is the IP Address and Port receiver like this 192.168.xxx.xxx:9890 (xxx.xxx filled IP Receiver),
Receiver IP display above is 192.168.2.106
click the LOGIN form will appear, fill Name: root, Password: root and then click OK.
4. on the main menu there are: a. Remote, b. Dvb App (both TSB menu can be used to control the receiver withdrawal For RCU), and c. TvPlayer (this is the menu that is in use For play / Streaming chanel2 imaginable in the receiver).
NB: The three other distinguished menu indeterminate discussed.
5. To play / live streaming video player, for example MXPlayer application, run the application MXPlayer, on the start screen click the 3 dots in the upper right corner and select Network Stream menu, fill in the URL with the format ip address receiver http://192.168.xxx.xxx : 9890 / live then click OK for begin streaming or with menggunan VLC for Android.


in the PC / Laptop:
1. Install VLC video player, to play / live streaming: run the VLC media player application, open the Media menu and select "Open Network Stream or CTRL + N", the contents of the URL field
 192.168.xxx.xxx:989/live (xxx.xxx filled Receiver IP) and then click the PLAY For start streaming.

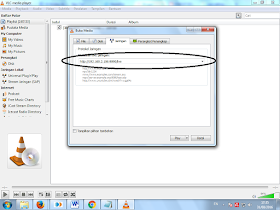
VLC on the PC display

2. For enable PC / Laptop as webremote as well as application Stbsmartclient at HP, download in here and install in Mozilla Firefox Plugin FBVLC.
3. Download Webremote here and extract to (Folder Webremote), extract the folder Webremote copy and paste into the root of the flash, then plug it into the receiver.
4. Run Mozilla Firefox and in the address bar contents URL address this bleak 192.168.xxx.xxx:9890 (xxx.xxx filled IP Receiver) press enter.

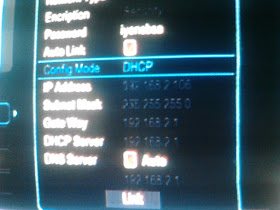
The setting in the RX, (I try to use AZZPLAY WIFI)
1. Menu >> Settings >> Network Setup >> Be sure Link Typenya Wifi Network, and select Config >>
2. Connectkan Wifi, select the link
3. Choose more, in addition to a link will appear 192.168.xxx.xxx IP Address.Receiver IP that you referred to in the previous point
Receiver IP display above is 192.168.2.106
4. Menu >> Settings >> Network Setting >> Webserver >> Make sure the Switch On
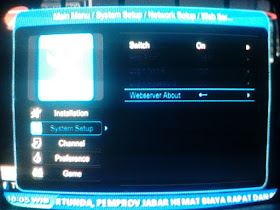
Webserver menu display in Reciver Azplay
Image Hosted by UploadHouse.com

Samsung Galaxy J7 2016 SM-J710GN/SM-J710F ver6.0.1 Marshmallow Rootလုပ္နည္း


Samsung Galaxy J7 2016 SM-J710GN/SM-J710F မ်ားအတြက္
ေနာက္ဆံုးထြက္ ဗားရွင္း 6.0.1 Marshmallow Root လုပ္နည္းကို
ေတာင္းဆိုထားၾကတဲ့ညီအကိုေတြအတြက္ တင္ေပးလိုက္ပါတယ္။
ဒီ J7 2016 Edition အတြက္ SM-J710GN/SM-J710F ဆိုၿပီး
Models ႏွစ္မိ်ဳးသာ ထြက္ရွိထားပါတယ္၊ ဒီဖုန္းေတြကို Root လုပ္
မယ္ဆိုရင္ေတာ့ One Click Tool ေတြေတာ့မထြက္ေသးပါဘူး
Custom Recovery ထည့္သြင္းၿပီး Supersu ျဖင့္ Flash ေပးၿပီး
Root လုပ္ယူႏိုင္မွာပဲျဖစ္ပါတယ္၊ ဒီနည္းလမ္းကေတာ့ 
အေလ့အထ ရွိၿပီးသား လူတစ္ေယာက္အတြက္ ပိုၿပီး 
အႀကိဳက္ေတြ႔ေစမယ့္
Strong အျဖစ္ဆံုး အေကာင္းဆံုး နည္းလမ္း ျဖစ္ပါတယ္။


Galaxy J7 2016 Edition မွာ က်ေနာ္ စမ္းသပ္ျဖစ္တဲ့ အလံုးကေတာ့
SM-J710GN ပဲျဖစ္ပါတယ္၊ Root access မရွိေသးတဲ့ သူေတြကေတာ့
ေဖၚျပပါ နည္းလမ္းအတိုင္း ေသခ်ာေအာင္ ျပဳလုပ္လိုက္ရင္ အဆင္ေျပပါၿပီ။
ဒီဖုန္းကို Root လုပ္ရန္အတြက္ TWRP & Kernel ကို ထည့္သြင္းၿပီး
Supersu.zip ျဖင့္ Custom Recovery Mode မွ Flash ေပးယူရမွာပါ။
>>>မွတ္ခ်က္<<<
TWRP & Kernel ႏွစ္ခုလံုးကို Flash လုပ္ၿပီးမွ အဆင္ေျပမွာျဖစ္လို႔
TWRP Recovery File တစ္ခုတည္းကိုသာ Flash ေပးၿပီး Supersu.zip ဖိုင္ကို ထည့္သြင္းၿပီး Root လုပ္မယ္ဆိုရင္ေတာ့ mount /data အတြက္ အဆင္မေျပပါ ဒါေၾကာင့္ TWRP တစ္ခုတည္းကိုသာ ထည့္သြင္းၿပီးမွ Supersu.zip ဖိုင္ကို Flash ျပဳလုပ္တာမိ်ဳးမျပဳလုပ္ပါရန္ အထူးမွာၾကားလိုပါတယ္။
Custom Recovery ဖိုင္မ်ားထည့္သြင္းၿပီး Root လုပ္နည္း
===============================
၁။ ဖုန္းမွာ OEM & USB Debugging mode ကိုဖြင့္ထားပါ
၂။ ေဒါင္းလုိ႕ရလာတဲ့ Odin zip ဖိုင္ကိုျဖည့္လိုက္ပါ
၃။ ေဒါင္းေလာ့ရလာတဲ့ twrp recovery & Kernel.zip ဖိုင္မ်ားကို
လံုး၀ zip ဖိုင္မျဖည္ပါနဲ႔ ဒီအတိုင္းထားပါ။
၄။ Odin ကိုဖြင့္ပါ AP or PDA ဆုိတဲ့ေနရာကို တစ္ခ်က္ႏွိပ္ေပးၿပီး ေဒါင္းေလာ့ရယူထားတဲ့
samsung-sm-j710f-6.0.1-nodmv.tar ဖုိင္ကုိအရင္ ထည့္လုိက္ပါ။
၅။ ျပီးရင္ ဖုန္းကုိ Download mode သြင္းလုိက္ပါ။
volume down + Home + power
ျပီးရင္ volume up တစ္ခ်က္ႏွိပ္ေပးလုိက္ပါ။
၆။ ဖုန္းမွာ Download mode ၀င္ျပီဆုိရင္ေတာ့ computer နဲ႕ ခ်ိတ္ဆက္ေပးလုိက္ပါ။
၇။ Odin Flash Tool တြင္ Auto Reboot ႏွင့္ F. Reset Time ေနရာမ်ားမွာ
အမွန္ျခစ္ေပးထားပါ၊ (Odin မွာ Auto ပါ၀င္ေနၿပီးသား)
၈။ Odin မွ ဖုန္းကုိသိျပီဆုိရင္ Start ဆုိတာေလးႏွိပ္ေပးလုိက္ပါ။
၉။ Process တစ္ခုၿပီးေအာင္ေစာင့္ေနလိုက္ၿပီး Odin မွာ ေအာင္ျမင္ေၾကာင္း
PASS ျပတဲ့အခါ ဖုန္းနဲ႔ ကြန္ပ်ဴတာ ခ်ိတ္ဆက္ထားတဲ့ USB ႀကိဳးကို ျဖဳတ္လိုက္ပါ။
၁၀။ ဖုန္းမွာ ပါ၀ါပြင့္ၿပီးတက္လာပါလိမ့္မယ္၊ 
အခ်ိန္အနည္းငယ္ၾကာႏိုင္ပါတယ္။
၁၀။ ဖုန္းကို TWRP ဖိုင္ကို ထည့္သြင္းေပးရဦးမွာျဖစ္လို႔ 
ပါ၀ါပိတ္ၿပီး
Volume Down + Home+ Power ကီးမ်ားကို 
တြဲႏွိပ္ၿပီး Download Mode သို႔ထပ္၀င္ပါ။
၁၁။ ဖုန္းမွာ Download mode ၀င္ျပီဆုိရင္ေတာ့ computer နဲ႕ ခ်ိတ္ဆက္ေပးလုိက္ပါ။
၁၂။ Odin ကိုဖြင့္ပါ AP or PDA ဆုိတဲ့ေနရာကို 
တစ္ခ်က္ႏွိပ္ေပးၿပီး
ေဒါင္းေလာ့ရယူထားတဲ့ samsung-sm-j710f-twrp3-2.tar ဖုိင္ကို ထည့္လုိက္ပါ။
၁၃။ Odin Flash Tool တြင္ Auto Reboot ႏွင့္ F. Reset Time ေနရာမ်ားမွာ
အမွန္ျခစ္ေပးထားပါ၊ (Odin မွာ Auto ပါ၀င္ေနၿပီးသား)
၁၄။ Odin မွ ဖုန္းကုိသိျပီဆုိရင္ Start ဆုိတာေလးႏွိပ္ေပးလုိက္ပါ။
၁၅။ Process တစ္ခုၿပီးေအာင္ေစာင့္ေနလိုက္ၿပီး Odin မွာ ေအာင္ျမင္ေၾကာင္း
PASS ျပတဲ့အခါ ဖုန္းနဲ႔ ကြန္ပ်ဴတာ ခ်ိတ္ဆက္ထားတဲ့ USB ႀကိဳးကို ျဖဳတ္လိုက္ပါ။
၁၆။ ဖုန္းမွာ ပါ၀ါပြင့္ၿပီးတက္လာပါလိမ့္မယ္၊ အခ်ိန္အနည္းငယ္
ၾကာႏိုင္ပါတယ္။
၁၇။ အဆိုပါ Kernel & TWRP ဖိုင္မ်ား ထည့္သြင္းျခင္း
ေအာင္ျမင္ၿပီးရင္ေတာ့
ဖုန္းကိုပါ၀ါပိတ္လိုက္ပါ၊ Volume Up + Home+ Power ကီးမ်ားကို တြဲႏွိပ္ၿပီး
Recovery Mode ကိုေခၚလိုက္ပါ Recovery Mode တြင္ Team win twrp recovery screen ျဖင့္ တက္လာခဲ့ရင္ေတာ့ သင့္ဖုန္းမွာ Custom Recovery 
ထည့္သြင္းၿပီးပါၿပီ။
၁၈။ BETA-SuperSU-v2.68.zip ဖိုင္ကို SD Card သို႔ Internal Storage သို႔
Copy ကူးထည့္လိုက္ပါ၊ ၿပီးရင္ ဖုန္းကို Volume Up + Home+ Power ကီးမ်ားကို တြဲႏွိပ္ၿပီး Recovery Mode ကို ထပ္ၿပီး၀င္လိုက္ပါ။
၁၉။ Advance ဆိုတာကို တစ္ခ်က္ႏွိပ္ၿပီး Wipe Devlik Cache မ်ားကိုရွင္းထုတ္လိုက္ပါ။
၂၀။ တကယ္လို႔ သင့္ဖုန္းရဲ့ SD Card ႏွင့္ Internal Storage မ်ားတြင္ Spece အလြတ္ ရွိေနေသးရင္ေတာ့ Backup ဆိုတာကို တစ္ခ်က္ႏွိပ္ေပးၿပီး Nandroid Backup ျပဳလုပ္ထားပါ။
(ဖုန္းမွာ SuperSu.zip ဖိုင္ကို Flash ျပဳလုပ္တဲ့အခါ 
မကိုက္ညီခဲ့ရင္ Firmware က Brick ျဖစ္ႏိုင္တာမို႔ ျဖစ္ႏိုင္ရင္ Nandroid Backup ျဖစ္ေအာင္ဆြဲထားလိုက္ပါ)
၂၁။ Install ဆိုတာကို ထပ္ႏွိပ္ၿပီး မိမိ Copy ကူးထည့္ထားတဲ့ SD Card ႏွင့္
Internal Storage မ်ားတြင္ ရွိသည့္ SuperSu.zip ဖိုင္ကို Flash ေပးလိုက္ပါ။
၂၂။ Flash Process ၿပီးဆံုးေအာင္ ေစာင့္ေနလိုက္ပါ၊ ၿပီးရင္ Recovery Menu သို႔ Back Key ကိုတစ္ခ်က္ခ်င္း ႏွိပ္ၿပီး ျပန္လာခဲ့လိုက္ပါ၊ Reboot System Now ကိုႏွိပ္
ၿပီး ဖုန္းကိုReboot ခ်ေပးလိုက္ပါ၊ ျပန္တက္လာတဲ့အခါ သင့္ဖုန္းရဲ့ Home Screen တြင္ SuperSu icon ေလးကို
ျမင္ေနရပါလိမ့္မယ္။
၂၃။ Root Access ရရွိေနပါၿပီ ေသခ်ာသြားေအာင္ Root Checker ျဖင့္ စမ္းသပ္ ၾကည့္လိုက္ပါ၊ 
 Root ေပါက္ေနတာကို ျမင္ေနရပါလိမ့္မယ္။
ျမန္မာစာ အမွန္ထည့္သြင္းနည္း
=================
Root Access သာ ရရွိထားၿပီး ျမန္မာစာမမွန္ေသးတဲ့ သူေတြအတြက္ေရာ့ ျမန္မာစာ ထည့္သြင္းဖို႔ ႀကိဳးစားေနတဲ့ သူေတြအတြက္ေရာ၊ ၿပီးေတာ့ Zawgyi Flashbable zip ဖိုင္မ်ားကို ထည့္သြင္းေပးမယ့္လည္း အခုခ်ိန္ထိ ျမန္မာစာ အမွန္မျမင္ရေသးတဲ့ သူေတြအတြက္ ေဖၚျပပါ နည္လမ္း 
အတိုင္း ျပဳလုပ္ေပးလိုက္ပါ။
100% ႏႈန္းျဖစ္ပါတယ္၊ က်ေနာ္ ကိုယ္တိုင္ စမ္းသပ္ၿပီးသား
ျဖစ္ပါတယ္
Custom Recovery ကိုထည့္သြင္းၿပီး ေနာက္ဆံုးထြက္ Zawgyi Flashbable zip ဖိုင္ကို ပံုမွန္အတိုင္း ထည့္သြင္းေပးမယ့္လည္း ဒီဖုန္းအတြက္ Support မလုပ္ပါဘူး
၁။ ကီးဘုတ္အတြက္ Frozen Keyboard 2 Update version ကို
Play Store ေဒါင္းေလာ့ၿပီး ထည့္သြင္းေပးလိုက္ပါ။
၂။ ေဖာင့္အတြက္ MM Aio Font Changer Pro_Beta 2.1.apk ကို
ေဒါင္းေလာ့လင့္တြင္ ေဒါင္းေလာ့ရယူၿပီး ထည့္သြင္း
ေပးလိုက္ပါ။
ဖုန္းမွာ Restart က်ၿပီးလို႔ ျပန္တက္လာတဲ့အခါ ေအာက္ပါပံုမ်ားအတိုင္း
Browser တြင္ျမန္မာစာ 100% ႏႈန္း ျမင္ေနရပါလိမ့္မယ္၊ Social App ေတြေတာ့ အထူးေျပာစရာမလိုေတာ့ဘူးေပါ့ဗ်ာ 
လိုအပ္တဲ့ ဖိုင္မ်ားကို ေအာက္မွာ တစ္ဖိုင္ထဲေပါင္းျပီး တင္ေပးထားပါတယ္

Image Hosted by UploadHouse.com

  #By zunic

Samsung Galaxy A5 (2016) root လုပ္နည္း


Samsung Galaxy A5 (2016) SM-A510FD ဆိုတဲ႔ Model က Root မေပါက္လို႔ဆိုျပီး ေျပာေနၾကတာနဲ႔ ထပ္တင္ေပးလိုက္ပါတယ္....။

Samsung Galaxy A5 ရဲ႕ SM-A510F / A510FD / A510Y / A510M Model အားလံုးကို အခုေဖၚျပမဲ့ နည္းလမ္းအတိုင္း Root ေဖါက္ႏိုင္ပါတယ္....


100% ပါ... ကိုယ္တိုင္ စမ္းသပ္ျပီးသားပါ..။

အရင္ဆံုး လိုအပ္တာေလးကို ေဒါင္းယူပါ...


Zip ဖိုင္လ္ထဲမွာ အားလံုးပါပါတယ္.... Zip ဖိုင္လ္ကို ျဖည္ထားပါ... 

(ဘာမွ မလုပ္ခင္ ဖုန္းထဲက အေရးၾကီးတာတြ အားလံုးကို Backup လုပ္ထားပါ)
Email (Gmail) ကို Singout လုပ္ပါ...


Phone Setting > Developer Option မွ OEM unlocking ကုိ Enable လုပ္ထားပါ...


Samsung Android USB Driver မရွိေသးရင္  ဒီမွာ  ေဒါင္းယူ Install လုပ္ပါ...။
   
Odin3-v3.10.7 ကို Run ပါ...


AP မွတဆင့္ ေစာေစာကေဒါင္းယူထားတဲ႔ ဖုန္းကို CF Autoroot ကို ေရြးေပးလိုက္ပါ.. [နံပါတ္ (1)]


ဖုန္းကို Power Off (ပိတ္) ပါ...

Volume Down + Home + Power ဆိုတဲ႔ ခလုတ္ သံုးခုကို တျပိဳင္တည္း ၁၀ စကၠန္႔ေလာက္ တြဲႏွိပ္လိုက္ပါ...


Download Mode ကို ေရာက္သြားျပီဆိုရင္ USB ၾကိဳးမွတဆင့္ ကြန္ပ်ဴတာႏွင့္ ခ်ိတ္ဆက္ေပးလိုက္ပါ..


How To Root Samsung Galaxy A8 SM-A800 Without PC


Odin မွ Start ကို ႏွိပ္ေပးလိုက္ပါ... ခဏေနရင္ အလိုေလွ်ာက္ Restart က်ျပီး ဖုန္းျပန္တတ္လာရင္ Root ေဖါက္တာ ေအာင္ျမင္သြားပါျပီ...။ [နံပါတ္ (2)]

Root ေပါက္ဖို႔အတြက္ဆိုရင္ ဒီအဆင့္နဲ႔ပဲ လံုေလာက္ပါျပီ... 


 ျမန္မာစာပါ ေနရာတိုင္းမွန္ဖို႔ဆိုရင္ေတာ့ Recovery တင္ရပါမယ္...  ေစာေစာကျဖည္ထားတဲ႔ Folder ထဲက TWRP 3.0.0.1.zip  ကို Flash ေပးလိုက္ပါ...

ျပီးရင္..

 Aung Thura (MMUG) ရဲ႕ Samsung Lollipop Font Solution V1.1 ကို ေဒါင္းယူျပီး SD Card ထဲသို႔ Copyထည့္ထားကာ.. ေစာေစာက Root ျပဳလုပ္သည့္နည္းအတိုင္း


 Recovery Mode ကိုဝင္ျပီး
 Volume UP +  Volume Down  ခလုတ္ေတြကို အသံုးျပဳကာ Install Zip မွာတဆင့္  Samsung Lollipop Font Solution V1.1 ကို Install လုပ္ေပးလိုက္ပါ....


အဆင္ေျပပါေစ...


ခင္မင္လွ်က္

CREDIT TO

ဝင္းကမာၻေက်ာ္

Image Hosted by UploadHouse.com

အသံုးအမ်ားဆံုး samsung လွ်ိဳ႕ဝွက္ကုဒ္မ်ား

<center> အသံုးအမ်ားဆံုး samsung လွ်ိဳ႕ဝွက္ကုဒ္မ်ား </center>
If you want to try these useful codes and want to have some fun, check out following list:
NOTE: To use these codes, you just need to open phone keypad or dialer app and type the code. As soon as you finish typing the code, it'll automatically execute and show the required information.
Samsung_Galaxy_Mobile_Phone_Dialer.png
*#06#
This is a universal code which will work in all mobile phones of any brand. This code shows the IMEI (International Mobile station Equipment Identity) number of the mobile phone which is unique for every mobile phone. Do not show or share your device IMEI number with anyone.
Samsung_Galaxy_Mobile_IMEI_SN_Code.png
*#0*#
This is an interesting and useful service code for Samsung mobile phones. This code allows you to test LCD, hardware and many other parts of your mobile phone. You might have seen many mobile repair mechanics or service center engineers using this code on mobile phones to test the hardware.
Samsung_Galaxy_Mobile_Test_Mode_Code.png
You can test colors, vibration, camera, touch screen, speakers and other sensors on your mobile phone with the help of this code.
*#1111#
This code can be used to know about the software (or firmware) version installed in your mobile phone.
Samsung_Galaxy_Mobile_Software_Version_Code.png
*#2222#
This code can be used to know about the hardware version of your mobile phone.
Samsung_Galaxy_Mobile_Hardware_Version_Code.png
*#1234#
This code shows the PDA and phone firmware information such as AP, CP and CSC version.
Samsung_Galaxy_Mobile_PDA_Phone_Version_Code.png
*#12580*369#
This code shows both software (AP, CP and CSC version) and hardware (RF cal and HW Rev.) information in one screen.
Samsung_Galaxy_Mobile_Software_Hardware_Information_Code.png
*#7353#
This is another useful code which helps you in testing various things of your mobile phone such as sound, vibration, camera, bluetooth and many sensors.
Samsung_Galaxy_Mobile_Service_Menu_Code.png
*#0011#
This code shows the status information of your GSM network such as registration status, GSM band, etc.
Samsung_Galaxy_Mobile_GSM_Network_Status_Code.png
*#0228#
This code can be used to know about the battery status such as battery level, voltage, temperature etc.
Samsung_Galaxy_Mobile_Battery_Status_Code.png
*#0283#
This code can be used to control packet loopback settings.
Samsung_Galaxy_Mobile_Loopback_Test_Code.png
*#9090#
This code allows you to control various diagnostic options such as RAM dump, etc.
Samsung_Galaxy_Mobile_Diagnostic_Control_Code.png
*#7412365*
This code can be used to know the Camera firmware information.
Samsung_Galaxy_Mobile_Camera_Firmware_Check_Code.png
*#34971539#
This code shows more advanced information about the Camera firmware. It also allows you to update Camera firmware. BUT do not try to use the options to update Camera firmware, it may damage the Camera functionality of your mobile phone.
Samsung_Galaxy_Mobile_Camera_Firmware_Update_Code.png
*#0808#
This code can be used to tweak USB settings on your mobile phone. Do not change the settings if you don't know about them.
Samsung_Galaxy_Mobile_USB_Settings_Code.png
*#9900#
This code is used to enter into System Dump mode which can be used to enable fast dormancy and boost network speed, etc.
Samsung_Galaxy_Mobile_System_Dump_Fast_Dormancy_Code.png
*#2663#
This code shows the touch screen (TSP and Touch Key) firmware information of your mobile phone. You can also update the TSP and TSK firmware using this code.
Samsung_Galaxy_Mobile_Touch_Firmware_Code.png
*#22558463#
This code can be used to reset total call time. Its same as you do in Call log -> More -> Call duration -> Reset.
*#272*IMEI#
This code can be used to show and change the Sales code (also known as CSC) of your mobile phone. Do not change anything if you don't know what these options do.
You'll need to replace IMEI string in this code with the correct IMEI code of your mobile phone which can be shown using *#06# code as mentioned above in the article.
Samsung_Galaxy_Mobile_Change_Sales_Code.png
#7465625*638*#
This is a very advanced code which allows you to insert Network Lock Control Key code. Do not enter any number without proper knowledge otherwise it may break the functionality of your mobile phone.
Samsung_Galaxy_Mobile_Network_Lock_Control_Code.png

SAMSUNG GALAXY J7 ringtone apk

သိပ္ျပီးေတာ့ေထြေထြထူးထူး ေျပာစရာေတာ့ မရွိပါဘူး။ RINGTONE ေတြကို ခေရစီျဖစ္တဲ႔သူေတြအတြက္ ထြက္ရွိလာတဲ႔ GALSXY J7 ringtone apk ေလးပါ။ android ver 4.0 မွ စ၍ အသံုးျပဳနိုင္ပါတယ္။

android ver 4.4 ေအာက္ႏွင့္ မေရွာင္ ႏွင့္ မဇူး တို႔မွာ အနဲငယ္ ေလးပါတယ္။ apk ထဲမွာ သံစဥ္ႏွင့္တြဲ၍ wallpaper ေတြပါ တပါတည္း ပါပါတယ္။ လိုအပ္သူမ်ား စိတ္ဝင္စားသူမ်ားေအာက္မွာေဒါင္းယူသြား ႏိုင္ပါတယ္။
Image Hosted by UploadHouse.com

Samsung galaxy mega 2 SM G750F Root ( NO NEED PC )


Samsung galaxy mega 2 SM G750F , Android Version 4.4.4 ကုိ Root အဆင္မေျပေသးတဲ့ သူငယ္ခ်င္းမ်ားအတြက္ ျပန္လည္မွ်ေဝေပးလုိက္ပါတယ္:-D

အရင္က CF Auto Root ေတြနဲ႔ အဆင္မေျပခဲတဲ႔ Model ပါ..


အဆင္ေျပၿပီးသားသူမ်ားကေတာ့ေက်ာ္သြားေပါ့ေနာ္.... :)

 [ကြန္ပ်ဴတာလဲမလုိပါ]


Kingroot Version 4.0 APK ေလးသာလုိပါတယ္...

လုိအပ္တဲ့ဖုိင္ကုိ ေအာက္မွာေဒါင္းလုိက္ပါ


ပထမဆံုး WiFi ဖြင့္ျပီး  အင္တာနက္ကို အရင္ခ်ိတ္ဆက္ထားပါ...

KingRoot.apk ကို ေဒါင္းၿပီးအင္စေတာလုပ္ပါ...

 ၿပီးရင္ ဖုန္းရဲ႕ USB dubuggingကုိ on ထားေပးပါ ... အရင္က onထားတယ္ဆုိရင္လဲ off လုပ္ၿပီး 
ျပန္onေပးလုိက္ပါ...

ၿပီးရင္ေတာ့ KingRoot App ေလးထဲဝင္ၿပီး 
Root လုပ္ႏုိင္ပါၿပီ..


ျမန္မာစာအတြက္ကေတာ့ တစ္ျခား Font Changer ႏွစ္ခု သံုးခု လာက္စမ္းၾကည့္တယ္... အဆင္မေျပပါဘူး...

MM aio Font Changer pro   နဲ႔ေတာ့ အဆင္ေျပပါတယ္.....


Followers